The Balance Sheet by Class Report was first introduced with QuickBooks 2011, however, it is also available in QuickBooks 2012, 2013, and 2014; has specific requirements for handling many or our normal day-to-day transactions. This will enable QuickBooks users to perform divisional accounting with QuickBooks, which was previously impossible or required significant duplication of effort.

QuickBooks calculates the class allocations for the report each time you run the report. Because of this, you must enter transactions in a very specific way. Follow these guidelines to ensure an accurate report. If you enter transactions differently, the report can produce unexpected results.
General Guidelines for Using the Balance Sheet by Class Report:
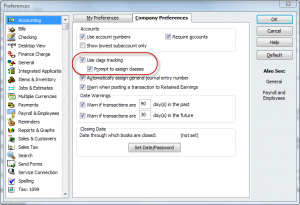
Verify/enable class tracking: From the QuickBooks Edit menu -> choose Preferences -> select Accounting -> and click on the Company Preferences tab. Here you will want to make sure that the Use class tracking and Prompt to assign classes are checked – turned on.

Set up/modify your Class List: From the Lists menu -> choose Classes, this displays a list of your current classes.
- If you are new to QuickBooks this list might be empty and you will need to create your list of classes.
- If you have been using QuickBooks for a long time there may be entries in the List window.
Be aware that transactions will have to be entered in a very specific manner and there are many data entry transactions that are not supported by the Balance Sheet by Class Report; which still cause additional data manipulation and work, for example:
- Each transaction can only have a single class.
If you enter one class on every transaction, you’ll avoid most unexpected results.
There are a few transactions where you can’t enter a class. In these cases, QuickBooks assigns the class based on the “original” transaction in the work flow.
Important: although you can enter multiple classes on certain transaction, it is NOT recommended that you do so. If you do enter multiple classes you will see unexpected results in the report.
- Use standard work flows in QuickBooks
When entering transactions, use the windows and order suggested on the QuickBooks Home Page. For example, standard workflows in QuickBooks include:
- Enter Bills -> Pay Bills
- Create Estimates -> Create Invoices -> Receive Payments -> Record Deposits
- Enter Time -> Pay Employees -> Pay Liabilities -> Process Payroll Forms

The biggest hurdle to using the Balance Sheet by Class Report is knowing which transactions are unsupported and learn how to solve the problems they produce.
- Journal entries with “unbalanced” classes.
- Paychecks allocated to multiple classes.
- Payroll liability payments.
- Sales Tax payments.
- Prepayments from customers entered in Receive Payments window.
- Discount entered in Receive Payments Window.
- Discounts entered in Pay Bills Window.
- Using multiple currencies.
- Pay bills with credit (with different classes).
- Use Funds Transfer window to transfer funds between classes.
View this video by Intuit demonstrating the Balance Sheet by Class Report in action.
Over the next few articles we’ll be discussing each of these unsupported transactions and how to work with them.
 |
Request our FREE 142-page “What’s New in QuickBooks 2011? eBook, by completing a simple request form.
This eBook will provide you with with all the information I’ve posted here in our blog, plus MORE! Once you’ve completed our simple request form, you’ll have instant access to this 142-page .pdf eBook, designed to be duplex printed and put in a binder for future reference. |
[…] 2011 – New Balance Sheet by Class Report – Part 1, we touched briefly on the fact that transactions will have to be entered in a very specific manner […]
[…] https://blog.sunburstsoftwaresolutions.com/2010/09/20/quickbooks-2011-new-balance-sheet-by-class-repo… This entry was posted in Business, Entrepreneurship and tagged accountant, bookkeeping, entrepreneur, Intuit, QuickBooks, Quickbooks 2011, small business, small business accounting. Bookmark the permalink. ← QuickBooks Assistance with Receivables […]
[…] Balance Sheet by Class […]
[…] QuickBooks 2011 – New Balance Sheet by Class Report Parts 1 – 8 […]
[…] For a detailed analysis of this report I recommend that you go to the blog by Nancy Smyth where she has an 11 part series of articles. […]
[…] Part 1, we touched briefly on the fact that transactions will have to be entered in a very specific manner and there are many data entry transactions that are not supported by the Balance Sheet by Class Report […]
[…] 2011 – New Balance Sheet by Class Report – Part 1, we touched briefly on the fact that transactions will have to be entered in a very specific manner […]
[…] our previous articles, QuickBooks 2011 – New Balance Sheet by Class Report – Part 1, we touched briefly on the fact that transactions will have to be entered in a very specific manner […]
Hello Stephen.
Thanks for stopping by and taking the time to leave a comment 🙂
The new & enhanced reports in QuickBooks 2011 are indeed steps in the right direction and a significant improvement in overall use & functionality for both accounting professionals and end-users.
When I mentioned divisional accounting being impossible and/or required significant duplication of effort, I was referring to obtaining a balance sheet by class report – which is difficult to obtain for non-accounting professionals or without significant training for end users.
Sounds like a small step in the right direction. Can’t wait to get my QBPA copy of QB 2011. I am looking forward to more insight about this useful feature.
I diagree with “divisional accounting with QuickBooks, which was previously impossible or required significant duplication of effort.” I have setup some systems for this, and the duplication of effort does not take that long. Besides duplication is what double entry bookkeeping is all about.
Nancy,
Great article. Very informative. As of now I do not have any clients that could use this type of report, but that can (and hopefully will) change at any time. Thanks for the heads up.
Diane Offutt, EA, MAcc
Woodstock, GA 30189
[…] QuickBooks 2011 – New Balance Sheet by Class Report – Part 1 […]
Wayne, I’m hoping it will improve in the future too. To be fair, this is a good start by Intuit as it will meet the needs of some customers.
Nancy, thanks for this analysis. If the Balance Sheet by Class cannot handle a bill or paycheck split to multiple classes, then its usefulness will be extremely limited. Disappointed, but hopeful it will be improved in future versions.
[…] This post was mentioned on Twitter by Shannon Tucker, Nancy Smyth-Sunburst. Nancy Smyth-Sunburst said: QuickBooks 2011 – New Balance Sheet by Class Report – Part 1 https://goo.gl/fb/t2dBg […]
Definitely the latter – using this feature will certainly be best left to CPA office or companies that have a full-time accountant on-staff/call to ensure that data entry protocols are strong. However, even CPA’s are going to have to change how they do things as you’ll see over the next few articles.
At this point, bearing in mind that I haven’t had a lot of experience with this report yet as I’m still learning the ropes too – I think this will be a powerful report only for companies that have simple needs.
Thanks for the detail. Looks like a powerful feature if setup and implemented carefully. Do you think small business people/non-accountants will want to try to use this feature, or better left to CPA offices and situations where data entry controls are pretty strong?