This QuickBooks tip discusses adding project information – such as the project name and location – to Invoices and Estimates – by using the Ship To Address block in the job record and modify the template slightly.

Adding Project Information to Invoices & Estimates
While there are a couple of ways to add project information – such as the project name and it’s location – to an Estimate or Invoice that you generate; I’ve always used the “Ship To” block in the Job record to hold this information.
From the QuickBooks Customer Center, pick a current Job from the Customers & Job list. You can click on the job name to select it and then click the Edit Job button OR if you double-click on the job name you’ll be taken to the Edit window.
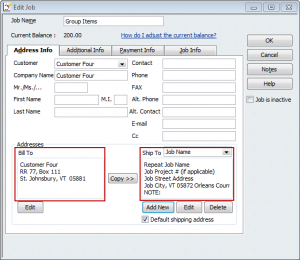
On the Address Info tab, look to see if there is any information in the “Ship To” block; if there isn’t, click the “Add New” button (located just below the Ship To block).
When you click on the “Add New” button, QuickBooks opens the Add Shipping Address Information window. Here you will enter details about the job that you want to display on your Estimates and Invoices – see sample screenshot below.

Be sure to check the option for default shipping address, and click the OK button to save the information. Your Job record now has both a billing and shipping address.

Next you’ll want to edit your Estimate and Invoice templates. From the Lists menu, choose Templates (if you aren’t sure which templates you use, click from the Home page click the Estimate or Invoice icons and the template name will be displayed in the upper right corner of the window), double-click on the Estimate template. This opens the Basic Customization window.
From the Basic Customization window, click on the Additional Customization button. On the Header tab – check the Screen and Print options for both the Name/Address and Ship To titles – you can even make changes to the information that displays on the final forms. For example, you can change Name/Address heading to read To Owner and Ship To to Project Information. See the before and after screenshot below.

NOTE: You may need to change the positioning in the Layout Designer, depending on what other options you select on this window.
Click the OK button twice.
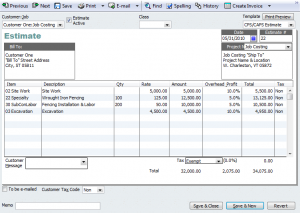
Switch to the Home Page, click the Estimate icon and choose the job that you originally edited. Your Estimate form now displays both billing and project information.

When you print your Estimate, this same information will display on your printed form.

We hope you’ve found this QuickBooks Tip for adding Project Information to your Estimates and Invoices to be valuable. If so please take a moment to leave a comment.
For someone who is self-taught in Quickbooks, these tips and tricks newsletters are invaluable! These are things it would take me months to figure out, assuming I had “spare” time to work on them. Thank you!
Amanda
Is this happening on an Invoice, Estimate, Purchase Order, etc.?
Also what version of QuickBooks (including year) are you using?
WHEN FILLING IN THE SHIPPING FIELDS, I PUT IN THE BILL TO AND THE SHIP TO. HOWEVER, WHEN I GO TO PRINT, OR EMAIL, THE SHIP TO SHOWS UP AS MY OWN ADDRESS? HOW CAN I CHANGE THIS?
Hi, thanks for stopping by and I’m so glad to hear that you find our QuickBooks information helpful 🙂
This information is great. I don’t think I have found a blog on Quickbooks as informative as this one. This is great for a bookkeeping services interested in more tips on Quickbooks.
Hi Kelcy
Thanks for dropping by and taking the time to leave a comment. Glad you found this tip helpful! QuickBooks can do a bunch of things – figuring out how can often be a head banger. Keep plenty of Advil on hand.
Thanks so much you just saved me from banging my head aganist the desk for another day!!! I searched all over to find out how I could add my info for the project onto my invoice!!
Hi Reesa, thanks for taking the time to make a comment! You’re absolutely correct, it IS the little things that make all the difference (or turn frustration into satisfaction). Have a great day, Nancy
You are reading my mind! I was just trying to modify a template and noticed that I could not add the “job description” field. Great tip, sometimes it is the little things that make all the difference. 😀
Hi Cris
Thanks for taking the time to post a comment 🙂 I’m glad that you find these tips & tricks valuable. It’s tough to figure out all the little hidden features and things you can make QuickBooks do if you “tweak it”.
For someone who is self-taught in Quickbooks, these tips and tricks newsletters are invaluable! These are things it would take me months to figure out, assuming I had “spare” time to work on them. Thank you!